• Recent
    • Unsolved
    • Tags
    • Popular
    • Users
    • Groups
    • Search
    • Register
    • Login
    1. Home
    2. george1421
    3. Best
    • Profile
    • Following 1
    • Followers 65
    • Topics 113
    • Posts 15,347
    • Groups 2

    Posts

    Recent Best Controversial
    • RE: "Please Enter TFTP Server" Message

      @jra said in "Please Enter TFTP Server" Message:

      Options 66 and 67 seem to be fine, and entering the IP of the FOG server dutifully boots it, but I can’t get it to just “get on with it” without typing that IP in.

      This is typically a condition of having 2 dhcp servers answering the pxe boot request. One dhcp server having options 66 and 67 set and the other one not.

      I would also check to ensure the WDS server is powered off because it can be messing with pxe boot. WDS will typically use ProxyDHCP OFFER packet, this OFFER will override any settings you have defined in dhcp options 66 and 67. How WDS gets hooked into other subnets is by your main subnet router. You would add the IP address of the WDS server as the last server listed in the dhcp helper/relay service. This is so the WDS server hears the clients DISCOVER packet.

      “So how do you figure out what is going on here?” Take/make a witness computer (computer on the same subnet as the pxe booting computer) and load wireshark on it. Use this exact capture filter port 67 or port 68 Start wireshark then immediately pxe boot the target computer to the error then stop wireshark.

      In the middle section you should see the DORA dhcp process (DISCOVER, OFFER, REQUEST, ACK/NACK). The target computer sends out a DISCOVER packet. Any (Proxy)DHCP server that hears the DISCOVER packet will answer with an OFFER packet. The OFFER packets is where you want to look. If you only have one OFFER packet then we will need to dig deeper. If you have more than one OFFER packet (what I suspect) Look in the ethernet header for {next-server} and {boot-file} those settings should match dhcp options 66 and 67 (found lower on the list). Your troubled DHCP server will have these values missing.

      Now if there is a ProxyDHCP server (i.e. WDS server response) dhcp option 60 will be set to identify the packet is a ProxyDHCP answer.

      Happy hunting…

      posted in FOG Problems
      george1421G
      george1421
    • RE: Error capturing Win 10 image after updating to the latest dev version - Resize Test fails

      @fog_newb Yes FOG default has always been 5%. The devs may need to revisit this decision for FOG 1.5.10 since it appears that current MS OS’ needs a bit more space than previous versions.

      posted in FOG Problems
      george1421G
      george1421
    • RE: Chainloading failed

      @jra I think there are a few concepts that we need to go over because you have a mixed environment.

      BIOS based computers will only boot a bios based boot loader (undionly.kpxe). The default and 99% working BIOS Exit mode is SANBOOT.

      UEFI based computers will only boot uefi based boot loaders (ipxe.efi). The default and working most of the time is rEFInd.

      This causes a problem if you have a static dhcp server where you manually set dhcp option 67 to a static value. If you want to boot a bios based computer you need to set dhcp option 67 to undionly.kpxe and if you want to boot UEFI you set it to ipxe.efi. If you have a windows based dhcp server you can use dhcp policies as outlined here to create a dynamic dhcp pxe boot options: https://wiki.fogproject.org/wiki/index.php/BIOS_and_UEFI_Co-Existence#Using_Windows_Server_2012_.28R1_and_later.29_DHCP_Policy If you have a linux dhcp server then the options are also available for dynamic dhcp booting. If you have a soho router or an ISP managed dhcp server then you can load dnsmasq on your FOG server to supply the pxe boot info only to your clients.

      Where you can run into a problem, with FOG its totally allowed to pxe boot into BIOS mode and deploy a UEFI image to the target computer. This works as long as the firmware and image on the hard drive match. Where you run into an issue is if you pxe boot through the iPXE menu in this mixed mode and want to boot to the hard drive and not do any imaging with FOG. If you pxe boot a UEFI computer using CSM in bios mode into the iPXE menu, iPXE can’t tell you did this. It thinks you have a bios computer and will try to use SANBOOT to load the OS. Since the disk structure is UEFI SANBOOT will fail (your error in the original post makes me think this is the case). The same is true for a UEFI boot into iPXE with a bios based image, rEFInd will not be able to chain to a bios boot image.

      Now for a new deployment (until FOG 1.5.10 comes out later this spring) I would recommend you do the following.

      1. Upgrade your FOG 1.5.9 install to the dev branch, this will bring your FOG install to 1.5.9.110 or later. This has the fixes in for Win10 20H1 and later.
      2. Update your iPXE version to the latest to get support for the current new hardware: https://forums.fogproject.org/topic/15826/updating-compiling-the-latest-version-of-ipxe/2
      3. Update your FOS Linux kernel to 5.15.x using Web UI -> FOG Configuration -> Kernel update. This updated kernel is needed for new hardware that has the realtek ethernet nic adapter installed.

      On my campus I require the techs to sit in front of the computer and intentionally pxe boot into FOG Imaging. I don’t have the target computers pxe booting through the ipxe menu every time. We reimage a computer maybe 2-3 times during the life cycle of a computer. There is no need to add the delay of pxe booting through iPXE menu. Plus windows has a nasty habit of changing the boot order to itself when OOBE/WinSetup finishes. Its just easier to have the techs press F12 during booting and select pxe boot when its time to reimage the computer. Plus this way we know we won’t reimage the wrong computer by accident.

      posted in FOG Problems
      george1421G
      george1421
    • RE: Kernal Panic when attempting Full Host Registration and Inventory

      @forcom5 The first thing I would do is upgrade the FOS Linux kernel to 5.15.x. The error is an issue between FOS Linux (the engine that does the imaging) and the hardware. So first step is to update the version of the FOS Linux kernel (FOG Web UI->FOG Configuration->Kernel update)

      Also make sure the firmware is up to date on the hardware.

      If there is still an error after that add the noacpi kernel parameter in the FOG settings page. Understand this is a global setting, but will help you get past registration. Once the device is registered you can set the kernel parameter field in the host definition page.

      posted in FOG Problems
      george1421G
      george1421
    • RE: Kernal Panic when attempting Full Host Registration and Inventory

      @forcom5 Well we typically see this with older hardware. It looks like thise 280 G1 systems have a 4 gen processor in them, so that makes me think they are on the older side. BUT if you have a working solution, run with it.

      posted in FOG Problems
      george1421G
      george1421
    • RE: Boot Device not found

      @bnstv said in Boot Device not found:

      CLI info
      NBP filename is undionly.kkpxe
      NBP filesize is 98899 Bytes
      Downloading NPB file …
      NBP file downloaded successfully

      EIther you double posted here or you are the second person to do this in the last 24 hours. NBP indicates UEFI, but you are sending a BIOS boot loader to the target computer. You need to send ipxe.efi if you want to boot into FOG on this uefi computer.

      You might also want to look into this article about setting up dynamic dhcp policies on your network. https://wiki.fogproject.org/wiki/index.php/BIOS_and_UEFI_Co-Existence#Using_Windows_Server_2012_.28R1_and_later.29_DHCP_Policy

      posted in FOG Problems
      george1421G
      george1421
    • RE: Unable to capture image after performing iPXE boot loader update

      @jyost Ok two things here.

      If that is a Windows 10 20H2 or later target computer you are going to need to do a few things. M$ changed the disk structure on 20H1 or 20H2 (sorry I can’t remember at the moment) but that 4th partition is now marked as unmovable. The developers have addressed this issue on the dev branch 1.5.9.111 The other thing is you probably need to update the FOS Linux kernel (FOG Web UI -> Fog Configuration -> Kernel update. Update to 5.10.55 or later for both x64 and x32 bit versions.

      posted in FOG Problems
      george1421G
      george1421
    • RE: Disable USB support in iPXE?

      @markg When we are talking about ipxe its important to know a few use cases.

      ipxe.kpxe (bios) and ipxe.efi (uefi) they are in a way kind of akin to the linux kernel. They have all of the known network drivers built into the bootloader (kernel). If new hardware comes out and has slighly different requirements than legacy hardware it may take the iPXE developer some time to create/import the drivers into a new release of iPXE. Since this version of iPXE has all of the known drivers on board the boot loader is quite large (in early 2000 standards).

      realtek.kpxe/realtek.efi or intel.kpxe/intel.efi. These are slimmed down versions of the larger ipxe.efi in that they only contain realtek or intel drivers with a few tweaks. Other than the few tweaks they are basically the same as ipxe.kpxe and ipxe.efi.

      The interesting ones are undionly.kpxe and snponly.efi. These bootloaders only contain either the generic undi (bios) or snp (efi) network drivers. Both of these use the network adapters built in firmware network interface to communicate on the network. For bios the ndi protocol has been around for 30 years and is very stable. For fog the recommended boot loader for bios is undionly.kpxe. Since undionly.kpxe only contains one network driver, its very small and fast (since it only has to test and setup one network interface). As for the snp protocol that has been around only for a few years 8 or so, and only really has become a stable protocol in the last few years. Up until last year the recommended uefi boot loader was ipxe.efi (because the snp protocol wasn’t stable FOG recommended the built in network drivers, because they basically worked). Within the last year or so the developers have been thinking that snp has matured enough and to start recommended snponly.efi as the default uefi boot loader. The network adapters support for snp protocol comes from the network adapter’s firmware creator so it will most likely be current with newly released hardware, where ipxe.efi may take several months to include drivers for newly released hardware.

      So the white elephant is, what is the difference between snp.efi and snponly.efi since they both use the snp protocol? The answer is simple and a bit complex. The short answer is snponly.efi will only init the network adapter that was used to download snponly.efi. snp.efi will initialize all snp network interfaces and not just the one that transferred snp.efi to the target computer. So with snp.efi, you could PXE boot from one network adapter and then image from a second network adapter. Its not likely to happen, but from a hardware standpoint its possible.

      posted in FOG Problems
      george1421G
      george1421
    • RE: pxe boot ubuntu 20.04.4 using iso

      @robertkwild All I can say is same, I walked away from Centos, disliked the direction Ubuntu was taking so I picked Debian and have been happy since (Its like ubuntu without the BS since its based on debian anyway).

      posted in FOG Problems
      george1421G
      george1421
    • RE: "Booting FOG Client" countdown

      @editor FWIW If you are having issues with dnsmasq not doing what you want you can review this post: https://forums.fogproject.org/topic/12796/installing-dnsmasq-on-your-fog-server

      The reason why I mentioned it is because a 3 second count down is not part of the standard dnsmasq settings. If you are missing those you might be missing others listed in the above post.

      If your dnsmasq configuration is working perfectly there is no need to review the post.

      posted in FOG Problems
      george1421G
      george1421
    • RE: Dell OptiPlex 5490 - cannot find disk

      @jflash In the computer’s firmware setting switch the disk mode from raid-on to ahci mode. That will unhide the disk.

      posted in FOG Problems
      george1421G
      george1421
    • RE: Unfreeze drive from FOG init image

      @c4c The screen doesn’t wake up. I think I was focused on you adding things to the init based on your post subject.

      You have to remember that FOG is intended for hit and run computing. It boots, it images, it reboots. There is no time for sleeping.

      With that said I’m betting there are bits missing in the linux kernel, since the kernel is responsible for managing the computer’s hardware. The FOS Linux kernel is not a general purpose OS, its customized specifically for imaging (hit and run and run computing).

      If it doesn’t come out of sleep then I would look at the ACPI settings in the kernel config. These values are not enabled in the FOS Linux kernel.

      apci1.png

      apci2.png

      It may also be a display driver. If you want to go down this path (and learn a bunch more). (I would first just turn on all of the apci functions and rebuild the kernel to see how it goes then do the hard parts [next]) Load a full linux distro onto this hardware. Then run this command lsmod This will list all of the kernel drivers that are running. You will need to look at each one to decide what they do. There may be one specific for either the display or possibly back light that needs to be included in the FOS Linux kernel.

      One thing you need to know about linux, you can either have dynamically linked drivers or integrated (compiled in). For speed and simplicity FOG uses compiled in select drivers, a traditional linux OS will typically used modular drivers to support a larger fleet of compute functions. The lsmod command will list those dynamically linked modules. You can not use the lsmod command to find the names of the compiled in modules, but there are other ways to determine that.

      Building the linux kernel is much like building the initrd file with buildroot. The process is similar so what you know now will help you with the next phase if you want it.

      posted in FOG Problems
      george1421G
      george1421
    • RE: Unfreeze drive from FOG init image

      @c4c Well that’s great you found a new way to extend fog beyond how the developers imagined it. Well done.

      Through some testing I found that while FOS Linux is its own operating system it most closely resembles Ubuntu 16.04 in its libraries as shipped. So, I found that precompiled applications for Ubuntu 16.04 seem to work on FOS Linux built on buildroot 2020.02. So if the application you need is not in the buildroot catalog sometimes you can borrow it from other sources precompiled.

      posted in FOG Problems
      george1421G
      george1421
    • RE: Unfreeze drive from FOG init image

      @c4c OK, Firstly I’ve detected you are a bit more advanced since what you have done so far. If you are not familiar with linux then don’t follow these directions since there will be holes and its not a complete step by step only a direction of the path you need to walk.

      first let me say my buildroot environment is setup differently than the way the dev’s setup their buildroot environment. Mine’s different because I build other embedded OS images outside of FOG.

      First you will need a linux computer to build the buildroot environment. Use current release of debian [10 or 11] or ubuntu 20.04 and install the build essentials package.

      For FOG 1.5.9 use this version of buildroot: https://buildroot.org/downloads/buildroot-2020.02.tar.gz

      Expand that tarball out to a working directory (i.e. ~/work). In the same working directory ~/work clone the FOS Linux repository on github. git clone https://github.com/FOGProject/fos That will create a fos directory (~/work/fos).

      Copy ~/work/fos/Buildroot ~/work/buildroot-2020.02

      edit ~/work/buildroot-2020.02/packages/Config.in add in the section from ``~/work/buildroot-2020.02/packages/newConfig.in` into near the bottom of the Config.in. This will add in the FOG package options into the buildroot menus.

      Lastly you need to copy over the fog settings for buildroot into your buildroot tree.

      Copy ~/work/fos/configs/fsx64.config to ~/work/buildroot-2020.02/.config (yes the hidden config file that starts with a dot).

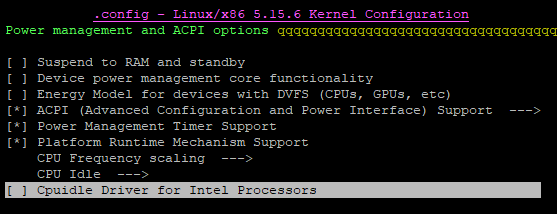
      Once you have everything in place from the buildroot base directory (~/work/buildroot-2020.02) key in make nconfig (you might get an error about missing libraries here, go back and load them then run it again).

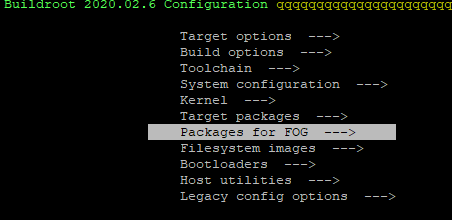
      You should now be in the buildroot configuration menu. I want you to check to see if the FOG package menus are listed and they are checked. This will confirm you have setup everything needed correctly. I know this is a lot of manual setup work, but in the end it will allow you to start at the same point FOS linux is for 1.5.9.

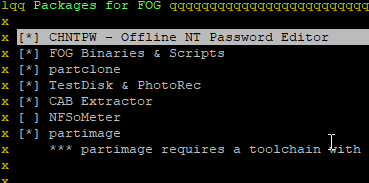
      The FOG added in menus will appear as this:
      fog1.png

      fog2.png

      Save the settings in the buildroot menu configuration and exit.

      Now key in make -j4 and that will start the process. If you have more than 4 processors you can increase the number of threads to use to decrease the build time. The first time through it may take 1hr to build the init.xz file. This is because its building all of the programs needed to build the init.xz file. On the second run it will be much faster since its only building the programs needed to build the init.xz file.

      Once the init.xz file is complete move it to the FOG server as init_test.xz (to not mess up the fog provided init.xz file). Now for your test target computer, go into the host management page for this specific computer and insert init_test.xz into the initrd field for this computer, save it. Now pxe boot the target computer, pick like hardware verification, watch the screen quickly as it will transfer bzImage and then init_test.xz to the test computer. If it does transfer init_test.xz then you have FOG configured correctly.

      This first run don’t change any settings from what the FOG developers have provided. You want to test to make sure you can successfully build the init.xz file. From that basis then you can make changes to the configuration using the make nconfig command. If you need to include files or stuff into the init.xz file you can add them to the ~/work/buildroot-2020.02/board/FOG/FOS/rootfs_overlay directory structure. These files get copied into the init.xz file as its being created. Any tweaks you did by unpacking the init.xz file can be inserted here.

      I know this is A LOT of information, because buildroot IS very complex. BUT you can modify the buildroot packages to include to give you the exact initrd you need.

      posted in FOG Problems
      george1421G
      george1421
    • RE: Unfreeze drive from FOG init image

      @c4c If you need to add functions / additional programs into the inits FOS is built on buildroot. If you are extensively tweaking the inits, there may be value in setting up a buildroot environment to rebuild the inits with your added in modifications. While this is not hard to do, it does take a little time and then the first build while creating the toolchains will take some additional time.

      If you need to go this far I can give you some guidance.

      posted in FOG Problems
      george1421G
      george1421
    • RE: PXE Issue Ubuntu 20.04

      @rogerbrowntdl said in PXE Issue Ubuntu 20.04:

      for future proofing if I extend the VHD on hyper-v to say 500gb

      Unfortunately that was one of the options I didn’t feel would add value. I must have done a bad job of explaining the situation. My suggestion was to live in the walled garden that has been created for you until you grow out of it or rebuild from the ground up.

      The ubuntu/OS disk only should consume about 30GB of space. I would suggest that you make it 50 GB for updates and whatnot. This is before you even load fog on it. Your Ubuntu install uses something called LVM (logical volume manager), which is a good thing, but in this instance it gets in the way.

      Your current situation is that the ubuntu install has created 3 partitions on that current vhd. You have boot, swap, and then partition 3 where the root file system is (think windows c drive). On that 3rd partition is a LVM volume. That lvm volume is using 62GB of the 125GB volume… <thinking>

      Edit: OK this may be the solution here to salvage what has been created for you.

      On your /dev/sda3 (third partition on the first hard drive) it is 125GB in size. The lvm volume group (think of it as a virtual virtual disk) ubuntu–vg and lvm logical volume (think of it as a virtual virtual partition) ubuntu–lv (isn’t abstraction great!!) is only consuming 62GB of that 125GB physical partition.

      So the first thing we need to do is backup or snapshot this VM, because the next steps could be destructive.

      Goal here is to extend the VLM volume ubuntu–vg to the extent of the physical partition /dev/sda3 (this partition at the end of the disk will allow us something usable in the future.). I’m not sure that the logical volume group needs to be extended, but I think yes. I would try to extend the logical volume first and if it complains then extend the lvm group. I did find a tutorial on how to do this and its use case fits pretty closely with your situation. See ref below.

      You should be able to start with the section Modify (extend) the LVM: In this case they reference /dev/vda1 you should use /dev/sda3 so your extend command should look something like this (follow along with their tutorial) sudo lvextend -l +100%FREE /dev/ubuntu--vg-ubuntu--lv (get the value from the lvdisplay not trust what I glued together. If all goes well it should extend that 62.8GB LVM to 125GB. You should use the lsblk command to confirm this happens. If it works correctly your root file system should grow from 62GB to 125GB after you run the resize2fs command.

      If that works then it puts you in an OK place. Because if you need more than 125GB for images then you can extend the VHD file (leaving room after /dev/sda3. You can extend /dev/sda3 partition and then repeat the same process as above to extend the LVM to the new size of /dev/sda3.

      While the above is surely possible I don’t know which would take more time, simply spinning up a new fog server as I mentioned before with a 50GB hard drive then before adding FOG add a second vhd and linking it into the /images directory before installing FOG, or just extending the VLM volumes.

      ref: https://carleton.ca/scs/2019/extend-lvm-disk-space/

      posted in FOG Problems
      george1421G
      george1421
    • RE: Connection timed out /fog/service/ipxe/boot.php

      @joanmarzo ?? OK but I don’t think the problem is FOG but if you want to reinstall that is your choice. We will be here to help if you need it.

      posted in FOG Problems
      george1421G
      george1421
    • RE: How to disable "password viewing" in the web UI

      @rogalskij I can say based on HTML, in theory it can be done. From a HTML/CSS perspective the programmers can just defined the field as password and the browser will encode the password so it can’t be viewed. If we can point to the fields that need to be protected we can submit a feature request. I don’t use that feature in FOG so I don’t know what fields need to be protected other than what you’ve mentioned.

      posted in FOG Problems
      george1421G
      george1421
    • RE: Problem to start Fog in Dell Latitude 5420 and Vostro 3500

      @joanmarzo Laptop bios/firmware settings.

      posted in FOG Problems
      george1421G
      george1421
    • RE: How to disable "password viewing" in the web UI

      @sebastian-roth said in How to disable "password viewing" in the web UI:

      Not sure I get what you mean

      I’m not totally sure either… I should have looked at the code and not guessed. Its good the OP was able to point to the screen with the visible password.

      posted in FOG Problems
      george1421G
      george1421
    • 1
    • 2
    • 132
    • 133
    • 134
    • 135
    • 136
    • 139
    • 140
    • 134 / 140