@aviel1540
Hi,
I think in the Settings you can active this Option under Quick Registration. I did not test it. But i saw it.
@aviel1540
Hi,
I think in the Settings you can active this Option under Quick Registration. I did not test it. But i saw it.
@1337darkin bluescreen? or the host hangs?
i do not know how could you do it on web gui, but i can tell you how clould you deactive the web gui configuration file and instead use the CLI to edit the dhcpf.conf file directry then i will work. But remember after that any changes on webgui will not be effected that is mean you have put your new changes over CLI.
do you have any idea how can i add the same rule on DHCP windows server?
class "UEFI-64-1" {
    match if substring(option vendor-class-identifier, 0, 20) = "PXEClient:Arch:00007";
    if exists user-class and option user-class = "iVentoy"{
    filename "iventoy_loader_16000_uefi";
    next-server 10.132.7.113;
} else {
    filename "ipxe.efi";
}
}
this is my file which i use:
<!--*************************************************
Windows 10 Answer File Generator
Created using Windows AFG found at:
;http://www.windowsafg.com

Installation Notes
Location:
Notes: Enter your comments here...
**************************************************-->
<?xml version="1.0" encoding="utf-8"?>
<unattend
	xmlns="urn:schemas-microsoft-com:unattend">
	<settings pass="windowsPE">
		<component name="Microsoft-Windows-International-Core-WinPE" processorArchitecture="amd64" publicKeyToken="31bf3856ad364e35" language="neutral" versionScope="nonSxS"
			xmlns:wcm="http://schemas.microsoft.com/WMIConfig/2002/State"
			xmlns:xsi="http://www.w3.org/2001/XMLSchema-instance">
			<SetupUILanguage>
				<UILanguage>de-DE</UILanguage>
			</SetupUILanguage>
			<InputLocale>0407:00000407</InputLocale>
			<SystemLocale>de-DE</SystemLocale>
			<UILanguage>de-DE</UILanguage>
			<UILanguageFallback>de-DE</UILanguageFallback>
			<UserLocale>de-DE</UserLocale>
		</component>
		<component name="Microsoft-Windows-Shell-Setup" processorArchitecture="amd64" publicKeyToken="31bf3856ad364e35" language="neutral" versionScope="nonSxS"
			xmlns:wcm="http://schemas.microsoft.com/WMIConfig/2002/State"
			xmlns:xsi="http://www.w3.org/2001/XMLSchema-instance">
			<FirstLogonCommands>
				<SynchronousCommand wcm:action="add">
					<CommandLine>cmd /c C:\Windows\Setup\scripts\UserFirstLogon.cmd</CommandLine>
					<Description>Description_of_command2</Description>
					<Order>1</Order>
				</SynchronousCommand>
			</FirstLogonCommands>
		</component>
		<component name="Microsoft-Windows-Setup" processorArchitecture="amd64" publicKeyToken="31bf3856ad364e35" language="neutral" versionScope="nonSxS"
			xmlns:wcm="http://schemas.microsoft.com/WMIConfig/2002/State"
			xmlns:xsi="http://www.w3.org/2001/XMLSchema-instance">
			<DiskConfiguration>
				<Disk wcm:action="add">
					<DiskID>0</DiskID>
					<WillWipeDisk>true</WillWipeDisk>
					<CreatePartitions>
						<!-- Windows RE Tools partition -->
						<CreatePartition wcm:action="add">
							<Order>1</Order>
							<Type>Primary</Type>
							<Size>300</Size>
						</CreatePartition>
						<!-- System partition (ESP) -->
						<CreatePartition wcm:action="add">
							<Order>2</Order>
							<Type>EFI</Type>
							<Size>100</Size>
						</CreatePartition>
						<!-- Microsoft reserved partition (MSR) -->
						<CreatePartition wcm:action="add">
							<Order>3</Order>
							<Type>MSR</Type>
							<Size>128</Size>
						</CreatePartition>
						<!-- Windows partition -->
						<CreatePartition wcm:action="add">
							<Order>4</Order>
							<Type>Primary</Type>
							<Extend>true</Extend>
						</CreatePartition>
					</CreatePartitions>
					<ModifyPartitions>
						<!-- Windows RE Tools partition -->
						<ModifyPartition wcm:action="add">
							<Order>1</Order>
							<PartitionID>1</PartitionID>
							<Label>WINRE</Label>
							<Format>NTFS</Format>
							<TypeID>DE94BBA4-06D1-4D40-A16A-BFD50179D6AC</TypeID>
						</ModifyPartition>
						<!-- System partition (ESP) -->
						<ModifyPartition wcm:action="add">
							<Order>2</Order>
							<PartitionID>2</PartitionID>
							<Label>System</Label>
							<Format>FAT32</Format>
						</ModifyPartition>
						<!-- MSR partition does not need to be modified -->
						<ModifyPartition wcm:action="add">
							<Order>3</Order>
							<PartitionID>3</PartitionID>
						</ModifyPartition>
						<!-- Windows partition -->
						<ModifyPartition wcm:action="add">
							<Order>4</Order>
							<PartitionID>4</PartitionID>
							<Label>OS</Label>
							<Letter>C</Letter>
							<Format>NTFS</Format>
						</ModifyPartition>
					</ModifyPartitions>
				</Disk>
			</DiskConfiguration>
			<ImageInstall>
				<OSImage>
					<InstallTo>
						<DiskID>0</DiskID>
						<PartitionID>4</PartitionID>
					</InstallTo>
					<InstallToAvailablePartition>false</InstallToAvailablePartition>
				</OSImage>
			</ImageInstall>
			<UserData>
				<ProductKey>
					<!-- Do not uncomment the Key element if you are using trial ISOs -->
					<!-- You must uncomment the Key element (and optionally insert your own key) if you are using retail or volume license ISOs -->
					<Key></Key>
					<WillShowUI>Never</WillShowUI>
				</ProductKey>
				<AcceptEula>true</AcceptEula>
				<FullName>administrator</FullName>
				<Organization></Organization>
			</UserData>
		</component>
	</settings>
	<settings pass="offlineServicing">
		<component name="Microsoft-Windows-LUA-Settings" processorArchitecture="amd64" publicKeyToken="31bf3856ad364e35" language="neutral" versionScope="nonSxS"
			xmlns:wcm="http://schemas.microsoft.com/WMIConfig/2002/State"
			xmlns:xsi="http://www.w3.org/2001/XMLSchema-instance">
                        <DriverPaths>
                            <PathAndCredentials wcm:action="add" wcm:keyValue="1">
                            <Path>C:\Drivers</Path>
                            </PathAndCredentials>
                        </DriverPaths>
			<EnableLUA>false</EnableLUA>
		</component>
	</settings>
	<settings pass="generalize">
		<component name="Microsoft-Windows-Security-SPP" processorArchitecture="amd64" publicKeyToken="31bf3856ad364e35" language="neutral" versionScope="nonSxS"
			xmlns:wcm="http://schemas.microsoft.com/WMIConfig/2002/State"
			xmlns:xsi="http://www.w3.org/2001/XMLSchema-instance">
			<SkipRearm>1</SkipRearm>
		</component>
	</settings>
	<settings pass="specialize">
		<component name="Microsoft-Windows-International-Core" processorArchitecture="amd64" publicKeyToken="31bf3856ad364e35" language="neutral" versionScope="nonSxS"
			xmlns:wcm="http://schemas.microsoft.com/WMIConfig/2002/State"
			xmlns:xsi="http://www.w3.org/2001/XMLSchema-instance">
			<InputLocale>0407:00000407</InputLocale>
			<SystemLocale>de-DE</SystemLocale>
			<UILanguage>de-DE</UILanguage>
			<UILanguageFallback>de-DE</UILanguageFallback>
			<UserLocale>de-DE</UserLocale>
		</component>
		<component name="Microsoft-Windows-Security-SPP-UX" processorArchitecture="amd64" publicKeyToken="31bf3856ad364e35" language="neutral" versionScope="nonSxS"
			xmlns:wcm="http://schemas.microsoft.com/WMIConfig/2002/State"
			xmlns:xsi="http://www.w3.org/2001/XMLSchema-instance">
			<SkipAutoActivation>true</SkipAutoActivation>
		</component>
		<component name="Microsoft-Windows-SQMApi" processorArchitecture="amd64" publicKeyToken="31bf3856ad364e35" language="neutral" versionScope="nonSxS"
			xmlns:wcm="http://schemas.microsoft.com/WMIConfig/2002/State"
			xmlns:xsi="http://www.w3.org/2001/XMLSchema-instance">
			<CEIPEnabled>0</CEIPEnabled>
		</component>
		<component name="Microsoft-Windows-Shell-Setup" processorArchitecture="amd64" publicKeyToken="31bf3856ad364e35" language="neutral" versionScope="nonSxS"
			xmlns:wcm="http://schemas.microsoft.com/WMIConfig/2002/State"
			xmlns:xsi="http://www.w3.org/2001/XMLSchema-instance">
                        <CopyProfile>true</CopyProfile>
		</component>
	</settings>
	<settings pass="oobeSystem">
		<component name="Microsoft-Windows-Shell-Setup" processorArchitecture="amd64" publicKeyToken="31bf3856ad364e35" language="neutral" versionScope="nonSxS"
			xmlns:wcm="http://schemas.microsoft.com/WMIConfig/2002/State"
			xmlns:xsi="http://www.w3.org/2001/XMLSchema-instance">
			<AutoLogon>
				<Password>
					<Value>010Filer</Value>
					<PlainText>true</PlainText>
				</Password>
				<Enabled>true</Enabled>
				<LogonCount>1</LogonCount>
				<Username>administrator</Username>
			</AutoLogon>
			<OOBE>
				<HideEULAPage>true</HideEULAPage>
				<HideOEMRegistrationScreen>true</HideOEMRegistrationScreen>
				<HideOnlineAccountScreens>true</HideOnlineAccountScreens>
				<HideWirelessSetupInOOBE>true</HideWirelessSetupInOOBE>
				<NetworkLocation>Work</NetworkLocation>
				<SkipUserOOBE>true</SkipUserOOBE>
				<SkipMachineOOBE>true</SkipMachineOOBE>
				<ProtectYourPC>1</ProtectYourPC>
			</OOBE>
			<UserAccounts>
				<LocalAccounts>
					<LocalAccount wcm:action="add">
						<Password>
							<Value>Start123!</Value>
							<PlainText>true</PlainText>
						</Password>
						<Description></Description>
						<DisplayName>administrator</DisplayName>
						<Group>Administrators</Group>
						<Name>administrator</Name>
					</LocalAccount>
				</LocalAccounts>
			</UserAccounts>
			<RegisteredOrganization></RegisteredOrganization>
			<RegisteredOwner>administrator</RegisteredOwner>
			<DisableAutoDaylightTimeSet>false</DisableAutoDaylightTimeSet>
			<FirstLogonCommands>
				<SynchronousCommand wcm:action="add">
					<Description>Control Panel View</Description>
					<Order>1</Order>
					<CommandLine>reg add "HKEY_CURRENT_USER\Software\Microsoft\Windows\CurrentVersion\Explorer\ControlPanel" /v StartupPage /t REG_DWORD /d 1 /f</CommandLine>
					<RequiresUserInput>true</RequiresUserInput>
				</SynchronousCommand>
				<SynchronousCommand wcm:action="add">
					<Order>2</Order>
					<Description>Control Panel Icon Size</Description>
					<RequiresUserInput>false</RequiresUserInput>
					<CommandLine>reg add "HKEY_CURRENT_USER\Software\Microsoft\Windows\CurrentVersion\Explorer\ControlPanel" /v AllItemsIconView /t REG_DWORD /d 0 /f</CommandLine>
				</SynchronousCommand>
				<SynchronousCommand wcm:action="add">
					<Order>3</Order>
					<RequiresUserInput>false</RequiresUserInput>
					<CommandLine>cmd /C wmic useraccount where name="administrator" set PasswordExpires=false</CommandLine>
					<Description>Password Never Expires</Description>
				</SynchronousCommand>
			</FirstLogonCommands>
			<TimeZone>W. Europe Standard Time</TimeZone>
		</component>
	</settings>
</unattend>
The default password is “Start123!” you can change it. Remember you have to use StartScript. the first Login will be automaticly after that you should put the password
@baovipboy156 i tested on vm and i did not get problems. I will test it on dell Laptops next week.
Bonus: you could make auto install Scripts “unatended.xml, preseed.cfg, etc…”
for more information: https://www.iventoy.com/en/doc_autoinstall.html
firsteval i will thank @baovipboy156 and @george1421 for helping me to make this configuration.
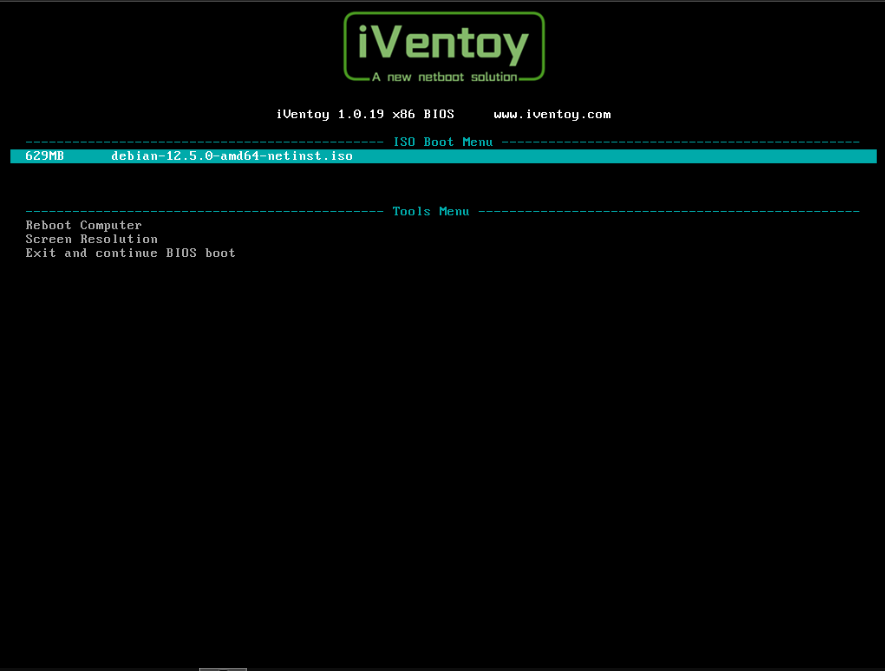
iVentoy is the next generation of Ventoy. It is a new netboot solution which could be used to run iso files directly from the PXE-Boot. Just put the ISO-Files in the right folder then you can see it as new boot option on iVentoy. It is very useful you do not have to set every OS on PXE boot menu of Fog-Server.
Attention: It is free to use till 20 devices and you are not allowed to use it for commercial purposes. For more information https://www.iventoy.com/en/doc_edition.html
in my example:
my dhcp Server: 192.168.111.1
my Fog Server: 192.168.111.125
my iVentoy Server: 192.168.111.122
Remember this is the basic configurations “same vlan”. that is why i will use the following configuration on iVentoy Server:
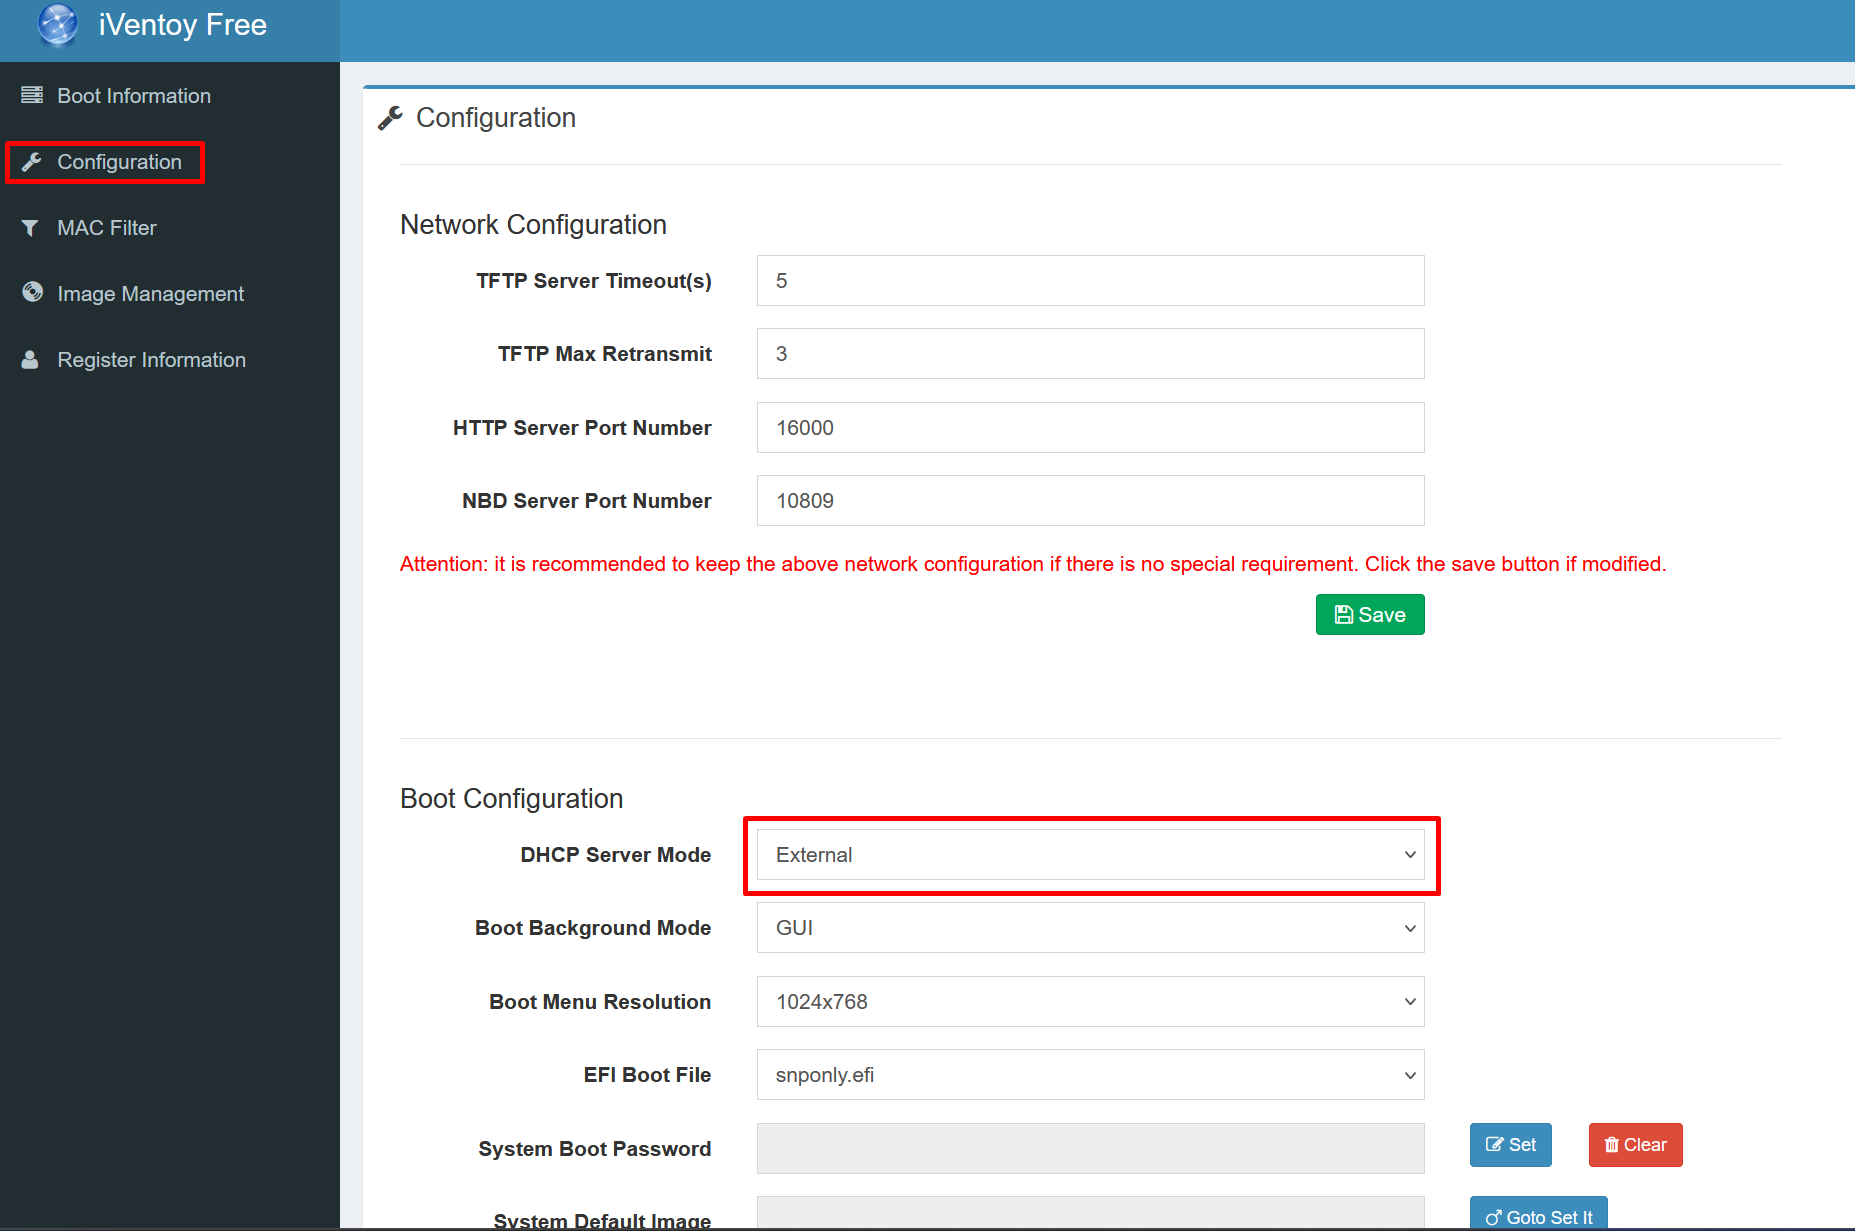
after save start the tftp boot service from “Boot Information”.
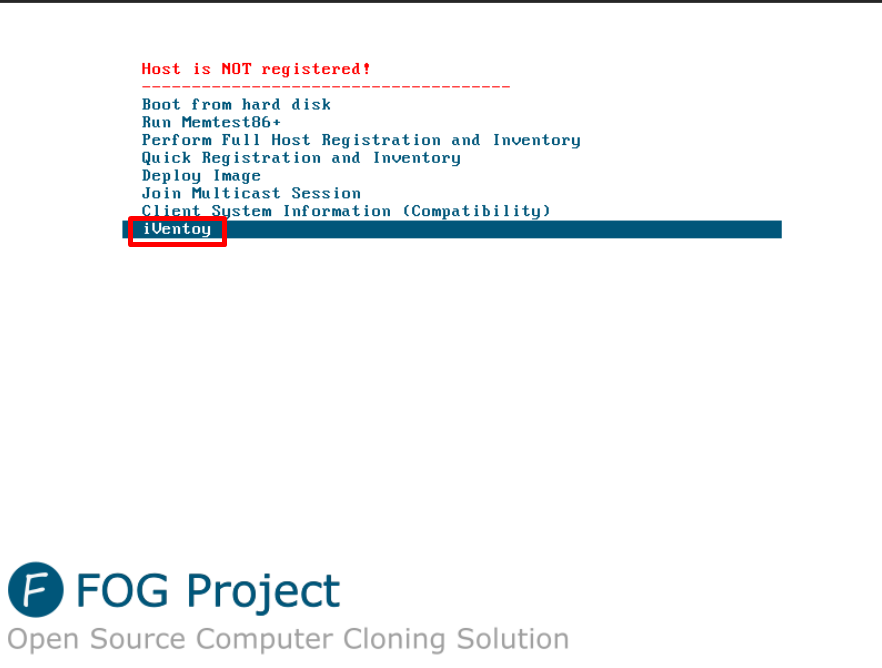
Then we have to add new boot option on Fog Server:
Menu Item       iVentoy
Description     iVentoy
Parameters      set newserver:ipv4 192.168.111.122 # ip adresse of iVentoy
                set newbootfile iventoy_loader_16000
                set net0/next-server ${newserver}
                set net0/filename ${newbootfile}
                chain tftp://${newserver}/iventoy_loader_16000
Menu Show       with  All Hosts
in the dhcpd.conf file Server edit the classes:
    class "UEFI-32-1" {
        match if substring(option vendor-class-identifier, 0, 20) = "PXEClient:Arch:00006";
        if exists user-class and option user-class = "iVentoy" {
            filename "iventoy_loader_16000_uefi";
            next-server 192.168.111.122; # IP Address of iVentoy
        } else {
            filename "i386-efi/ipxe.efi";
        }
    }

    class "UEFI-32-2" {
        match if substring(option vendor-class-identifier, 0, 20) = "PXEClient:Arch:00002";
        if exists user-class and option user-class = "iVentoy" {
            filename "iventoy_loader_16000_uefi";
            next-server 192.168.111.122; # IP Address of iVentoy
        } else {
            filename "i386-efi/ipxe.efi";
        }
    }

    class "UEFI-64-1" {
        match if substring(option vendor-class-identifier, 0, 20) = "PXEClient:Arch:00007";
        if exists user-class and option user-class = "iVentoy" {
            filename "iventoy_loader_16000_uefi";
            next-server 192.168.111.122; # IP Address of iVentoy
        } else {
            filename "ipxe.efi";
        }
    }

    class "UEFI-64-2" {
        match if substring(option vendor-class-identifier, 0, 20) = "PXEClient:Arch:00008";
        if exists user-class and option user-class = "iVentoy" {
            filename "iventoy_loader_16000_uefi";
            next-server 192.168.111.122; # IP Address of iVentoy
        } else {
            filename "ipxe.efi";
        }
    }

    class "UEFI-64-3" {
        match if substring(option vendor-class-identifier, 0, 20) = "PXEClient:Arch:00009";
        if exists user-class and option user-class = "iVentoy" {
            filename "iventoy_loader_16000_uefi";
            next-server 192.168.111.122; # IP Address of iVentoy
        } else {
            filename "ipxe.efi";
        }
    }

    class "Legacy" {
        match if substring(option vendor-class-identifier, 0, 20) = "PXEClient:Arch:00000";
        if exists user-class and option user-class = "iVentoy" {
            filename "iventoy_loader_16000_bios";
            next-server 192.168.111.122; # IP Address of iVentoy
        } else {
            filename "undionly.kkpxe";
        }
    }
}
restart your DHCP-Server and test your configuration on fog Client.
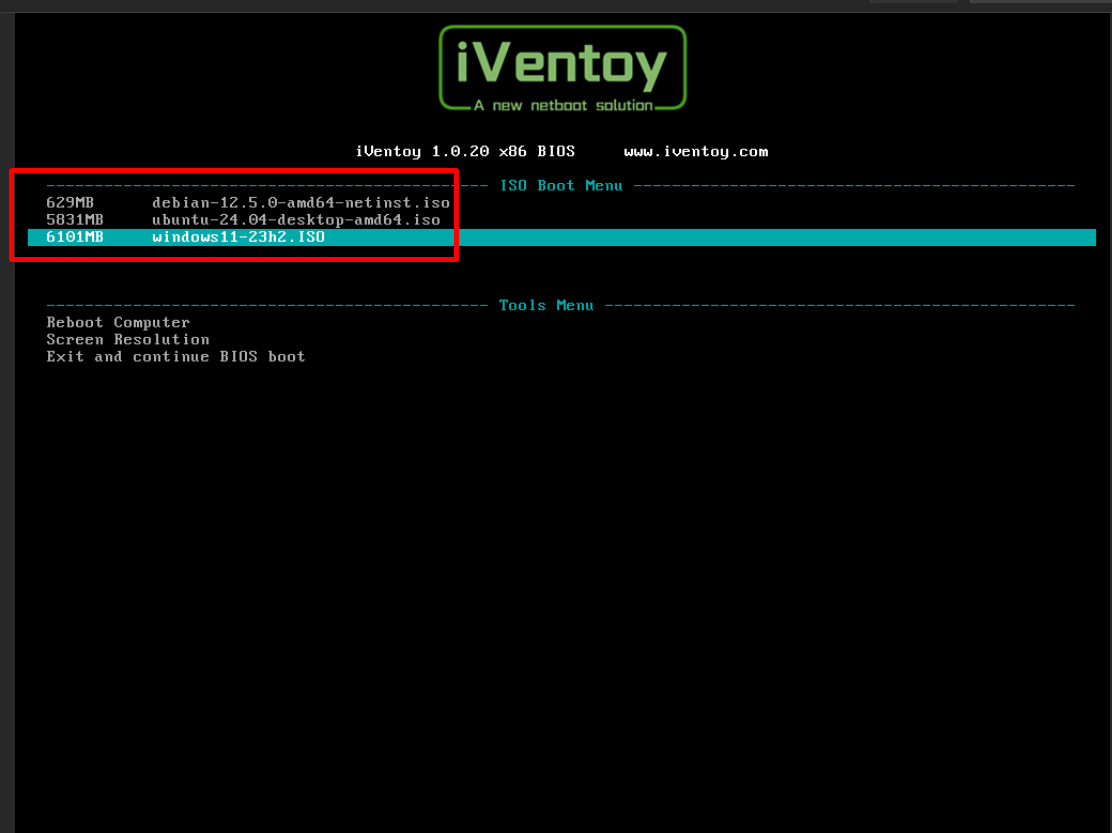
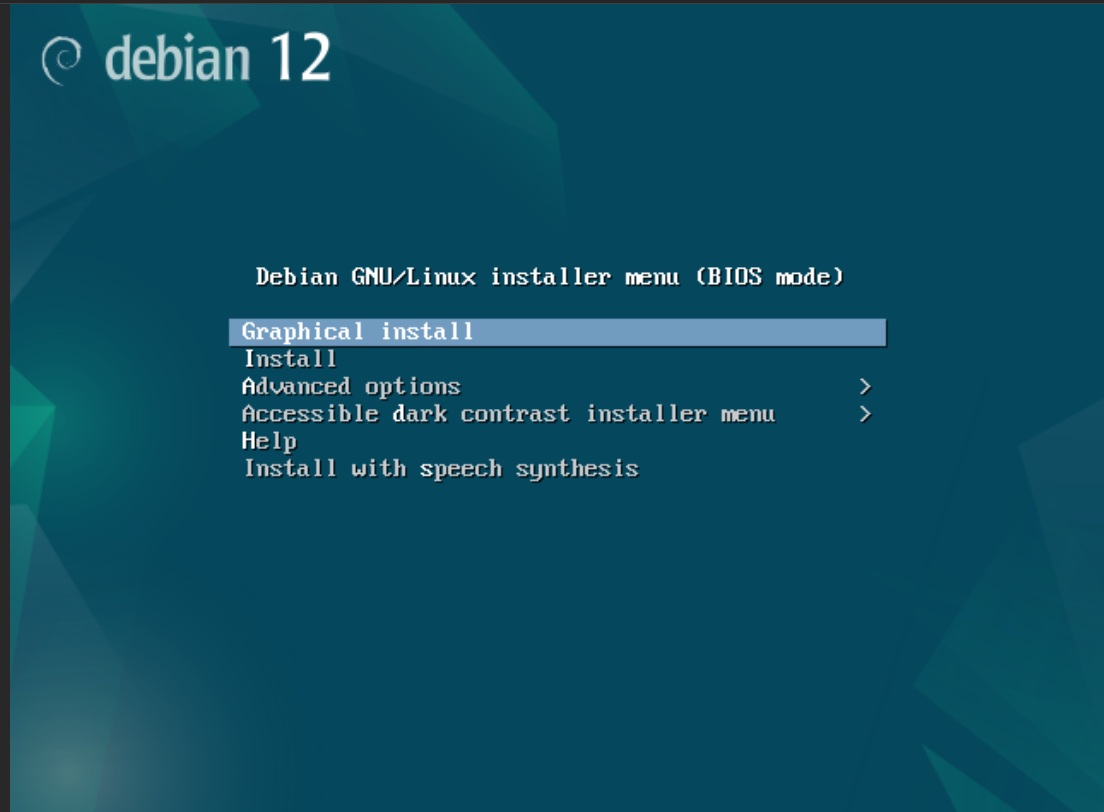
and after i boot with debian ")
Windows 11
have a nice day
i tried on test server it is pfsense as DHCP-Server it works… Thank you.
i will try it on my main Server next week … it is windows server.
@george1421 if you want i can post the configuration that i used to configure iventoy as next server after fog server… live photos:
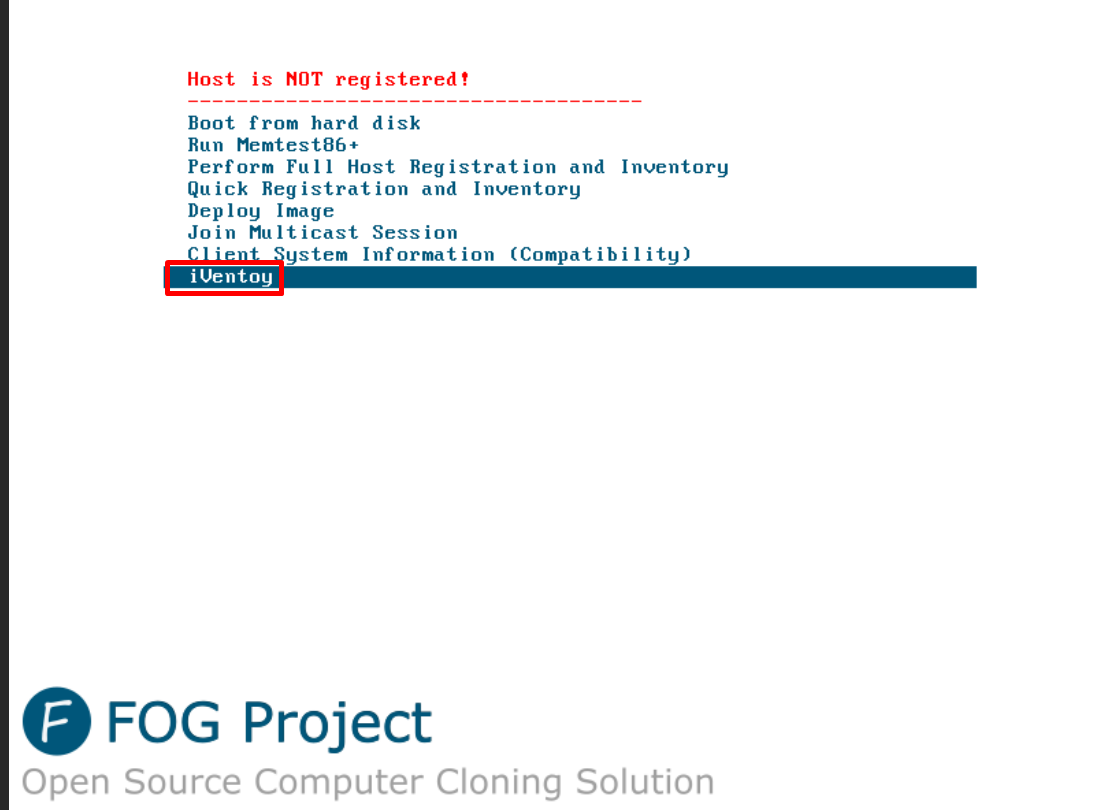
after i chose iVentoy…
thank you guys you made my day…
@george1421 i changed to ExternalNet. but nothing has been changed. I found something in the community of ventoy which could help me.
maybe you can tell me what the post means. because am not good enough in pxe.
https://forums.ventoy.net/showthread.php?tid=2743
someone posted:
I managed to chainload from my main iPXE to iVentoy, basically you need to do following things:
1. In your main iPXE boot.ipxe file, set user-class to a specific value, such as MyCustomClass
2. In your dhcp server, match this user-class and send next-server as your iVentoy IP
3. In your main iPXE boot.ipxe, run 'dhcp' command, after 'set user-class MyCustomClass' command, then 'chain tftp://${next-server}/iventoy_loader_16000'
Done
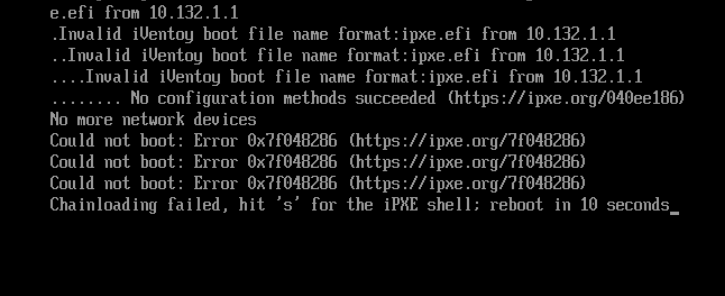
@george1421 no thing changed. the PC will ask the DHCP Server 10.132.1.1 again about the the pxe.efi file.
in the boot menu entry looks like
set newserver:ipv4 10.132.7.113
set newbootfile iventoy_loader_16000_uefi
set net0/next-server ${newserver}
set net0/filename ${newbootfile}
chain tftp://${newserver}/${newbootfile}
@george1421 my DHCP Server is on Windows Server. I did not use dnsmasq. You can correct me.
Unfortunately is not an opensource but it is free to use till 20 devices. You can buy the pro version it will be cost 50$. https://www.iventoy.com/en/index.html
It will be useful if fog server can forward to the iventoy.
@george1421 you are right sorry:
the fog ip-adresse: 10.132.1.62
the dhcp server: 10.132.1.1
the oventoy adresse: 10.132.1.113
what do you see in the boot gui is the ip adresse of the dhcp server.
@george1421 Thank you again, both ways took me back to the pxe boot interface and the client tries to boot with the DHCP Server IP-Adresse. Which is not the Fog Server…
i used the config :
set newserver:ipv4 10.xy.xy.113 #IP Adresse
set newbootfile iventoy_loader_16000 # my boot file

set net0.dhcp/next-server ${newserver}
set net0.dhcp/filename ${newbootfile}
set proxydhcp/filename ${newbootfile}

chain tftp://${newserver}/${newbootfile} || goto Menu
this is what i see on client. Note: the default boot file is the ipxe.efi
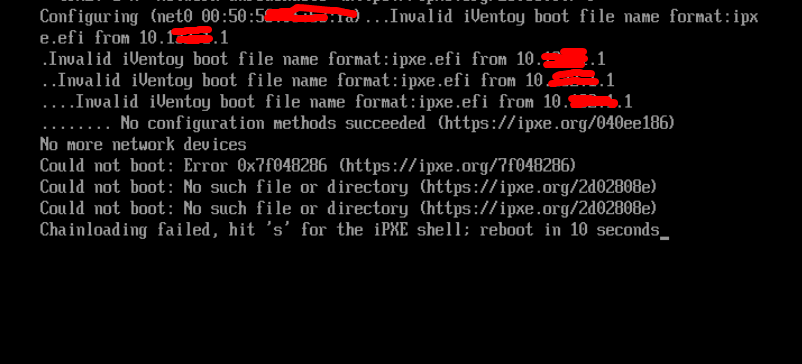
i do not know why the client will try with ipxe.efi file
best regards
@george1421 Thank you for ur advice. The LiveCD version is to create USB-Boot devices over LiveCD. That does not help me.
Update: I found another Version from iVentoy. This version is for network pxe boot.
is it possible to create new boot entry and set the IVentoy as next Server?
Notes:
My DHCP Server is Windows Server 2019
My Fog Server is the next server
iVentoy: is on another host in the network.
iVentoy uses the file iventoy_loader_16000 as boot file. The bootfile name is actually a virtual file name. iVentoy will provide the real bootfile to the client according to its BIOS mode.
best regards
Hello every body,
is there anyway to add ventoy to the boot menu?
my plan is that i want to add this feature to create master images over ventoy.
best regards
@TectonicLeader
Check the IP-Addresse of the Storage on Fog Server. You should set it on the new IP-Addresse. And Check the IP-Address in /opt/fog/.fogsettings.